You know that look your dog gives you when you’re eating something delicious? That’s exactly why I started making Duck Yogurt Chews for Dogs! My pup Baxter would stare me down every time I had yogurt, so I decided to whip up something special just for him. These homemade chews combine juicy duck meat with creamy yogurt – simple, wholesome ingredients you can feel good about. Trust me, your furry friend will go crazy for these healthy treats! They’re perfect for training rewards or just saying “I love you” in dog language. Plus, they’re way better than store-bought snacks packed with mystery ingredients.

Why Your Dog Will Love Duck Yogurt Chews
Let me tell you why my dogs go absolutely nuts for these chews – and why yours will too! First off, the duck meat? Pure doggy heaven. It’s packed with protein and has that rich, meaty flavor dogs can’t resist. And the yogurt? Oh, it’s the magic ingredient that makes these treats extra special. Here’s what makes them so paw-some:
- Irresistible taste: That combination of savory duck and tangy yogurt? Total tail-wagger!
- Perfect for training: These chews are just the right size for rewarding good behavior.
- Gentle on tummies: The probiotics in yogurt help with digestion.
- No weird additives: Just simple, wholesome ingredients you can pronounce.
- Chewy texture: Gives dogs that satisfying crunch they love without being too hard on their teeth.
Honestly, I’ve never seen Baxter get so excited about a treat – and he’s a pretty picky eater!
Ingredients for Duck Yogurt Chews
Here’s what you’ll need to make these drool-worthy treats for your pup:
- 1 cup duck meat – Cooked and shredded (I usually roast it, but boiled works too!)
- 1/2 cup plain yogurt – Make sure it’s unsweetened and free of artificial flavors.
- 1 tablespoon honey – Just a touch of natural sweetness dogs love.
- 1/4 cup oat flour – You can make your own by blending rolled oats until fine.
That’s it – simple, wholesome, and totally dog-approved!
How to Make Duck Yogurt Chews
Okay, time for the fun part – making these tasty treats your pup will adore! Don’t worry if you’re not a master chef – this recipe is so easy, even my 8-year-old nephew could do it (though he might sneak a bite for himself!). Here’s the step-by-step magic:
Step 1: Preheat and Prepare
First things first – crank your oven to 200°F (93°C). This low-and-slow temperature is perfect for drying out the chews without burning them. While that’s heating up, line a baking sheet with parchment paper – trust me, this will save you from sticky situations later!

Step 2: Mix the Ingredients
Now grab a big bowl and toss in your shredded duck, yogurt, honey, and oat flour. Get in there with your hands (clean ones, of course!) and mix until everything is totally combined. You want it to look like a thick, meaty paste – if it’s too wet, add just a bit more oat flour.
Step 3: Spread and Bake
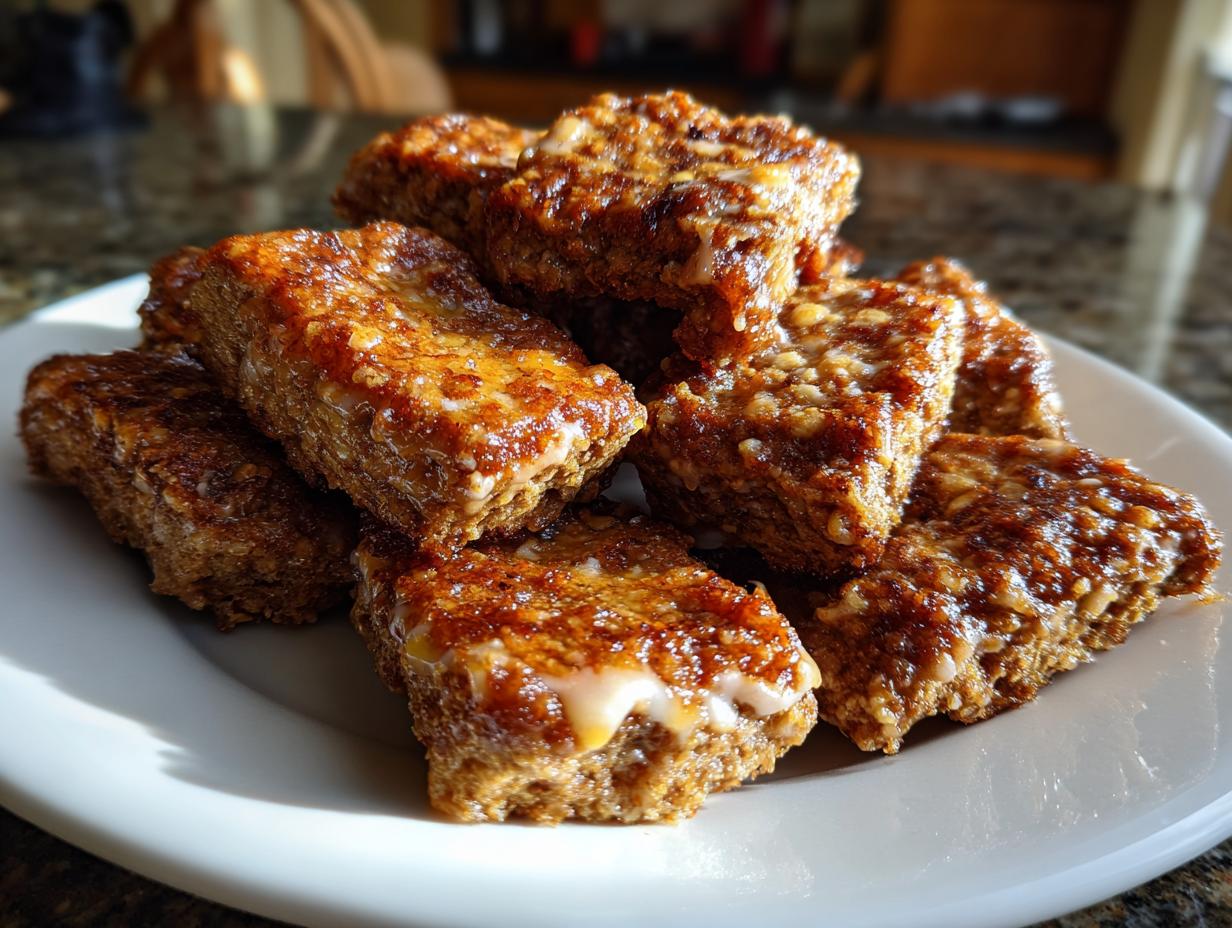
Time to get messy! Scoop your mixture onto the prepared baking sheet and spread it out evenly – aim for about 1/4 inch thickness. Pop it in the oven and let it work its magic for 2 hours. You’ll know it’s done when the edges start pulling away slightly and the top looks dry to the touch.

Step 4: Cool and Serve
Here’s the hardest part – waiting! Let those chews cool completely before you even think about breaking them into pieces. I usually cut them into strips while still warm (much easier), then let them cool fully so they get nice and crispy. Now try them out on your toughest critic – that furry friend waiting impatiently at your feet!
Tips for Perfect Duck Yogurt Chews
After making dozens of batches (Baxter insists on quality control!), I’ve picked up some tricks for foolproof Duck Yogurt Chews every time:
- Yogurt matters: Always use plain, unsweetened yogurt – flavored kinds often contain xylitol, which is toxic for dogs. Greek yogurt works great too!
- Shred it right: Hand-shredding the duck gives the best texture, but pulse it briefly in a food processor if you’re short on time.
- Watch the clock: Set a timer! At this low temperature, 5 extra minutes can mean the difference between chewy and crunchy.
- Safety first: If your pup has sensitive tummy or allergies, check with your vet before introducing new treats.
- Get creative: Swap duck for chicken or turkey if needed – just adjust baking time since leaner meats dry faster.
Remember, every dog’s different – start with small pieces to see how your pup likes them!
Storage and Reheating Instructions
Here’s the scoop on keeping those Duck Yogurt Chews fresh! I always store mine in an airtight container – Mason jars work great, but any sealed container will do. They’ll stay delicious for up to 2 weeks at room temperature. No need to refrigerate unless your kitchen gets super warm (above 75°F). Pro tip: If they soften up from humidity, just pop them back in the oven at 200°F for 10 minutes to crisp them right up!
Nutritional Information for Duck Yogurt Chews
Every batch of Duck Yogurt Chews is a little different, so these numbers are just estimates. The values can vary depending on the brand of ingredients you use – like how fatty your duck is or what kind of yogurt you pick. For one chew (about the size of a nickel), you’re looking at roughly 25 calories, 2g of protein, and 1g of sugar. Remember, these treats are meant as an occasional snack – not a meal replacement. Always check with your vet if you’re unsure about your dog’s dietary needs!
Frequently Asked Questions About Duck Yogurt Chews
I get asked about these Duck Yogurt Chews all the time – here are answers to the questions that pop up most often:
Can I use chicken instead of duck?
Absolutely! Chicken works beautifully if duck’s hard to find. The texture might be slightly different since chicken’s leaner, so keep an eye on baking time. Turkey’s another great alternative that dogs love.
How long do these homemade chews last?
Stored properly in an airtight container, they’ll stay fresh for about 2 weeks. If you want them to last longer, you can freeze them for up to 3 months – just thaw at room temperature before serving.
My dog is lactose intolerant – any substitutions?
Try lactose-free yogurt or coconut yogurt! Just check the label to make sure there’s no xylitol or added sugars. The honey helps bind everything together even if you reduce the yogurt slightly.
Can I make these treats bigger?
Of course! For bigger dogs, spread the mixture thicker before baking – just add 15-20 minutes to the baking time. Break them into whatever size works best for your pup.
Why oat flour instead of regular flour?
Oat flour’s easier on doggy tummies and adds extra fiber. If you’re in a pinch, you can use whole wheat flour – just use a bit less since it absorbs more moisture.
Share Your Experience
Have you tried these Duck Yogurt Chews yet? I’d love to hear how your pup liked them! Leave a comment below telling me what flavor combos you tried or share a pic of your dog enjoying their homemade treats. And if you loved this recipe, be sure to rate it – Baxter gives it five enthusiastic tail wags!

For more dog treat inspiration, check out this Pinterest board!
Print
Irresistible Duck Yogurt Chews Your Dog Will Devour in 2 Hours
- Total Time: 2 hours 15 minutes
- Yield: 20 chews
- Diet: Low Lactose
Description
Duck Yogurt Chews for Dogs are a healthy and tasty treat made with simple ingredients. These chews are perfect for training or rewarding your dog.
Ingredients
- 1 cup duck meat, cooked and shredded
- 1/2 cup plain yogurt
- 1 tablespoon honey
- 1/4 cup oat flour
Instructions
- Preheat your oven to 200°F (93°C).
- Mix the shredded duck, yogurt, honey, and oat flour in a bowl.
- Spread the mixture onto a baking sheet lined with parchment paper.
- Bake for 2 hours or until the chews are dry and firm.
- Let them cool completely before serving to your dog.
Notes
- Store in an airtight container for up to 2 weeks.
- Check with your vet if your dog has allergies.
- Use plain yogurt without added sugars or flavors.
- Prep Time: 15 minutes
- Cook Time: 2 hours
- Category: Dog Treats
- Method: Baking
- Cuisine: Pet Food